Monday, August 1, 2011

Boundary Iron Pin Mask

This tip may be floating around out there, but I came up with this version myself. When drawing Boundary surveys in Civil 3D or AutoCAD we always had a problem with the Property Corner symbol (See Figure 1) say you had a corner where two property lines meet and you show a circle for the Iron Pin or some other material unless you trimmed the lines within the circle they overlapped worse yet if you trimmed the lines inside the circle the distances got messed up. This new Style masks the lines underneath the circle without actually trimming them. 

Figure 1 "Before"

"After"

Create a new Point Label Style or copy an existing one and modify it. Name it "Boundary Circle Mask" Go to the Layout tab and click on the ellipses button in the contents parameter under the Text fly out; delete the default text string and type a period (yes I said a tiny period) make sure you match all of the settings in Figure 2 & 3. Make sure the background mask is set to true as in figure 3. Click
OK to exit out.


Figure 2

Figure 3


Sunday, July 17, 2011

What is this White thingy on my screen???

Ahhhhh..... This little white thing that is always on the screen in model space. What is it and why can't I get rid of it? says just about everybody. Well there is a way to turn it off by just changing a setting. The best practice is to open your company template file and change it there for everybody.

1. Open your template drawing.

2.Type "GEOMARKERVISIBILITY" on your command line and set it to 0.

3. That's it. You could be "the man" this week at the office with this little tidbit of info.

Saturday, July 2, 2011

Where is my Right Click Osnap Shortcut??

This is one of the first questions I hear when people start using Civil 3d that were previously using Land Desktop. Where is my Right Click Osnap Shortcut. You would think that their dog got run over. However I'm about to reunite you with Fido. Civil 3D didn't do away with your command they just added a extra button to it.

Here it is:    Press and hold down "Shift" and Right Click your mouse and presto there it is.

Tuesday, May 31, 2011

Fillet Preview in Civil 3D 2012

I always remember having to fillet a corner of something and unless I had a actual radius size to apply it was sometimes guess work. A new feature in 2012 is the preview within the Fillet command. Once you specify your radius size you select your first object and when you go to select your second object a preview of what it will look like appears if you don't like it you can change the parameters before you draw the final arc.

Monday, May 2, 2011

Surface Grid Ticks (In Color)

I have posted a step by step guide (see link below) to create color grid ticks in Civil 3D that most of us are familiar with. It seems the simple grid tick creation command that was in LDD was not included in the newer versions of Civil 3D.

Surface Grid Ticks In Color (Step by Step) pdf

Friday, April 29, 2011

Civil 3D 2012 New Feature (Point Rotation Options)

I'm going thru the process of switching over to the 2012 version and as I get more comfortable with it I have so far discovered one neat change in the Cogo Points section. In previous releases the process of rotating a point marker was to select the point and pick the rotate grip to rotate the marker which also rotates the other point components. The new process is a little different; now when you select the point hover over the marker grip and it gives you three options one of which is the ability to rotate only the marker. I really like this command.

Before 


After

Monday, April 25, 2011

Exporting to Previous AutoCAD Versions

It seems to never fail when I send a Civil 3D 2011 or 2012 drawing to a client or contractor I always get the dreaded email in response. "Can you send it as a 2000, 2004, or 2007 version please" depending on which release they are using. You may be surprised at how many people never left Release 14 which is very sad.

That being said I have developed a procedure that so far has cut the follow up complaints to a minimum when they open the new drawing. If you have a better procedure or have additional advice, please share.

  1. First I save the drawing as a new name just as a precaution.
  2. Next I purge everything I can
  3. Then I audit the drawing with the "Y" option
  4. Then I type in "aecobjexplode" for good measure
  5. Then I use the export to AutoCAD option to the desired version. 
  6. Done

I did have problems using the save as a previous version option, at least from the clients that were opening it up in a older Land Desktop version so make sure you use the Export option.

Drawing Smooth Arcs Through COGO Points


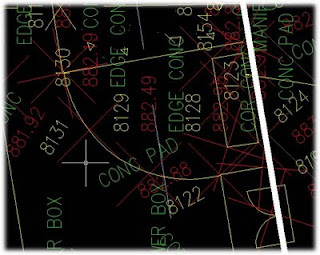
Connecting the dots between shots around a radius used to be left looking like straight lines instead of a smooth curb return as (Figure 1) shows. It looks like something that C&G (Archaic Program) would put out (a inside joke around here and by joke I mean some people are still using it here in the office).
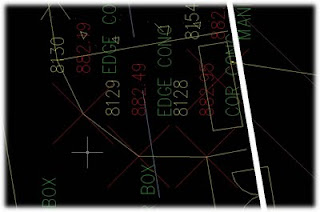
Figure 1

To start the process of drawing a proper radius choose “Create Best Fit Arc” as in (Figure 2).
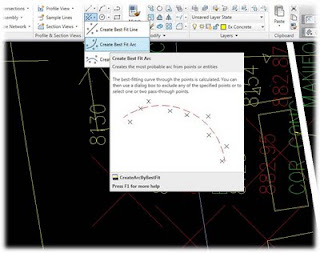
Figure 2

The Arc by Best Fit dialog box comes up (Figure 3). Pick the “from COGO points” and click OK.
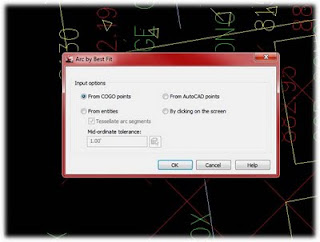
Figure 3

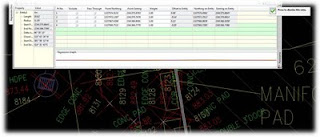
Next select your COGO points from the PC to the PT of the curve. Notice after you pick the third point a dashed red arc appears. See (Figure 4)

Figure 4

When you select the last point in the arc hit enter to bring up the segment dialog box (Figure 5) here you can adjust your arc path by either removing or adding points. When you are satisfied with your path choices select the green checkmark in the upper right corner.

Figure 5

The end result is a nice pretty and smooth arc (Figure 6). You may have to adjust the beginning and end points via grips to join it precisely to the tangents.

Figure 6


Wednesday, March 30, 2011

Repairing a Civil 3d Installation

We had a situation today that involved a workstation not loading Civil 3d. I had cleaned the registry yesterday to free some space up on his SSD and it wiped something of importance away. He was googling the fix so I thought I would put the solution on here for everybody to see. He is running Windows 7 64 bit, so I will use that as the example.

Go to start - control panel - programs-uninstall a program - pick AutoCAD Civil 3D and select "change" and the Autodesk dialog screen will pop up giving you the option to repair or uninstall the installation.

Wednesday, March 23, 2011

Using Hatching to Calculate Areas

Did you know that you can extract areas from hatching? say you are hatching a undisturbed creek buffer and you want to know the area. just use the area command and select object to get the answer. this saves a lot of time versus the old way of having to draw a rough polyline around an area in question.

Sunday, March 20, 2011

Microsoft Office and Civil 3D

I don't know how many times I have noticed people still doing things the old way when it comes to inserting word and excel documents into a drawing. I always end up showing them the advantages of pasting a link to the original document so that when the document is revised the drawing is automatically updates too.
In either program it works the same with the document open copy all of the contents to the clipboard. In  Civil 3d on the Ribbon press the down arrow on Paste and select paste special then make sure paste link is selected. Now when ever you update your document file the drawing withe the document will update.

Wednesday, March 16, 2011

"Creative" Free Online Storage

You have seen the advertisements for online storage sites for your files. They charge you either a monthly fee or some other way; well I can give you a idea that could be more useful for you and better yet it's free. The users who already use Google's Gmail service already now this trick and if not here you go.
First you sign up and create your email account then email yourself files from where ever you are. Google keeps the files on their servers and you can organize the data in folders. The amount of space in each email account as of this post is 7562 MB and growing every second. The only limit you may encounter is the file size limit per email which is 20mb per file which is still alot more than other email services. I use my Gmail account to store files and then when I'm at a remote location I always have access to them. Hope this helps.

Tuesday, March 15, 2011

Viewport Cycling

A common problem when you have overlapping view ports is that sometimes you can't edit one of them or it acts unwieldy. The solution is to be in model space on your current tab and press "CTRL+R" to cycle thru all of the view ports that are present. It is similar to cycling thru objects.

Tuesday, February 8, 2011

Windows 7 Activation

Today's tip has nothing to do with Civil 3d, but this is still a valuable tip. When you install Windows 7 you have a option to activate the product upon completion of the installation process. I always like to spend some time making sure everything works together on the computer; because you may have to reinstall Windows and you know the headache involved with re-activation.

This tip allows you to rearm the 30 day activation clock up to 3 times, which gives you a total of 120 days to experiment before you have to activate.

Press the start button and browse to the command prompt under program files - accessories (Never type cmd in the search line the rearm command will not work). change the directory to c: (cd\ enter) next type in this line slmgr (space) -rearm and press enter. You will have to reboot your system but when you do you should notice the 30 day clock has been reset.

Sunday, January 16, 2011

Importing Google Earth Images and Surfaces into Civil 3D

Have you ever played with the Google Earth commands which allow you to bring in a image and a surface of what you have zoomed into on google earth? Well let me fill you in with the problem I know you have (or at least I have experienced). First and foremost it is very neat that Autodesk and Google go together good, however the first problem I have with one of them is that when I go to import an image it shows up as black & white. B&W? Really? I'm sure that will change with future releases. The second and most perplexing problem is when you try to import a surface into Civil 3D it starts good and hangs up around 50% everytime. The solution I have found that works is to install a older version of Google Earth. Try a version around 5.2 or so.

I will put a link to a older version here for you in a day or so.

Wednesday, January 5, 2011

Plot Style Files (Where are they?)

In the past releases it has always been a hide and seek approach to finding where the plot styles are located. Each release and operating system has them buried under numerous folders.

Here is a simple technique to circumvent the situation. Type "Stylesmanager" in the command line and a new explorer window opens in the exact location of your plot styles.

Tuesday, January 4, 2011

Quick Access Toolbar

I know this may be simple to some, but another question I get asked a lot is "Where is my Pull Down Menu Bar?" The answer is in the top left corner where a little pull down arrow is located in the tool bar (which is the quick access toolbar"). Pull down the arrow and select show menu bar.

Another tip is to add any favorite command that you use regularly. You add the command to the quick access toolbar by right clicking on your command of choice and selecting the "add to quick access toolbar".

Monday, January 3, 2011

Block Editor and Edit Block in Place

It's amazing to me that people still don't use the block editor or edit block in place commands. Say you have a drawing open that you have inserted a block that you use as a symbol and you want to change the color or layer, before you had to open the actual block drawing and make the changes and then save and reinsert the block.
Now if you launch edit block in place it opens the block inside your current drawing with all of the editing features. You can change whatever you want and it will update all blocks in your drawing without having to do anything other than save changes to your edit.