Friday, April 29, 2011

Civil 3D 2012 New Feature (Point Rotation Options)

I'm going thru the process of switching over to the 2012 version and as I get more comfortable with it I have so far discovered one neat change in the Cogo Points section. In previous releases the process of rotating a point marker was to select the point and pick the rotate grip to rotate the marker which also rotates the other point components. The new process is a little different; now when you select the point hover over the marker grip and it gives you three options one of which is the ability to rotate only the marker. I really like this command.

Before 


After

Monday, April 25, 2011

Exporting to Previous AutoCAD Versions

It seems to never fail when I send a Civil 3D 2011 or 2012 drawing to a client or contractor I always get the dreaded email in response. "Can you send it as a 2000, 2004, or 2007 version please" depending on which release they are using. You may be surprised at how many people never left Release 14 which is very sad.

That being said I have developed a procedure that so far has cut the follow up complaints to a minimum when they open the new drawing. If you have a better procedure or have additional advice, please share.

  1. First I save the drawing as a new name just as a precaution.
  2. Next I purge everything I can
  3. Then I audit the drawing with the "Y" option
  4. Then I type in "aecobjexplode" for good measure
  5. Then I use the export to AutoCAD option to the desired version. 
  6. Done

I did have problems using the save as a previous version option, at least from the clients that were opening it up in a older Land Desktop version so make sure you use the Export option.

Drawing Smooth Arcs Through COGO Points


Connecting the dots between shots around a radius used to be left looking like straight lines instead of a smooth curb return as (Figure 1) shows. It looks like something that C&G (Archaic Program) would put out (a inside joke around here and by joke I mean some people are still using it here in the office).

Figure 1

To start the process of drawing a proper radius choose “Create Best Fit Arc” as in (Figure 2).

Figure 2

The Arc by Best Fit dialog box comes up (Figure 3). Pick the “from COGO points” and click OK.
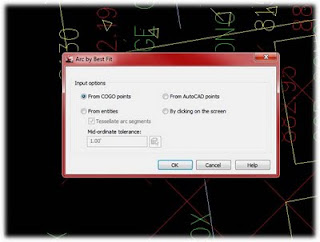
Figure 3

Next select your COGO points from the PC to the PT of the curve. Notice after you pick the third point a dashed red arc appears. See (Figure 4)

Figure 4

When you select the last point in the arc hit enter to bring up the segment dialog box (Figure 5) here you can adjust your arc path by either removing or adding points. When you are satisfied with your path choices select the green checkmark in the upper right corner.

Figure 5

The end result is a nice pretty and smooth arc (Figure 6). You may have to adjust the beginning and end points via grips to join it precisely to the tangents.

Figure 6